《智能体设计模式》中文翻译计划启动
正如《设计模式》曾是软件工程的圣经,这本由谷歌资深工程主管免费分享的《智能体设计模式》,正为火热的 AI 智能体领域带来首套系统性的设计原则与最佳实践。
本书由 Antonio Gulli 撰写、谷歌 Cloud AI 副总裁 Saurabh Tiwary 作序、高盛 CIO Marco Argenti 鼎力推荐,系统性地提炼出 21 个核心智能体设计模式,涵盖从提示链、工具使用到多智能体协作、自我修正等关键技术。
接下来的一段时间,我将和几位小伙伴一起通过「AI 初次翻译 → AI 交叉评审 → 人工评审 → 人工交叉评审」的方式来翻译这本书,所有翻译内容将会持续更新到开源项目:github.com/ginobefun/agentic-design-patterns-cn
已翻译章节:
- 00 -《智能体设计模式》前言部分
- 01 -《智能体设计模式》第一章:提示链模式
- 02 -《智能体设计模式》第二章:路由模式
- 03 -《智能体设计模式》第三章:并行模式
- 04 -《智能体设计模式》第四章:反思模式
- 05 -《智能体设计模式》第五章:工具使用模式
工具使用模式精华概览
工具使用模式让智能体能够突破大语言模型训练数据的局限,与外部系统、接口和服务进行交互。通过函数调用机制,智能体不再局限于文本生成,而是能够获取实时信息、执行计算、操作数据库,甚至控制现实世界的设备。这里为大家梳理几个关键要点:
1. 核心理念:从文本生成到行动执行
工具使用模式的核心在于建立「理解需求 → 决策调用 → 执行工具 → 整合结果」的交互流程,让智能体具备感知和改变外部世界的能力。
- 传统模式的局限:基础大语言模型只能基于训练数据生成文本,无法获取实时信息、执行精确计算或触发外部操作,知识是静态的且与现实世界脱节。
- 工具使用的价值:通过函数调用机制,智能体可以调用外部工具来获取最新数据、执行复杂计算、访问私有信息或触发现实操作,使其从被动的文本生成器变成主动的行动执行者。
2. 工具调用的六步流程
工具使用模式通过标准化的流程实现智能体与外部系统的协作:
- 工具定义:向大语言模型描述可用的外部函数,包括用途、名称、参数类型和说明。
- 大语言模型决策:模型根据用户请求和工具定义,判断是否需要调用工具来完成任务。
- 生成函数调用:模型生成结构化输出(通常是 JSON),指明要调用的工具名称和提取的参数。
- 工具执行:智能体框架捕获输出并执行相应的外部函数调用。
- 观察/结果:工具执行的结果返回给智能体。
- 结果处理:模型将工具输出整合到上下文中,生成最终回复或决定下一步操作。
3. 典型应用场景
工具使用模式在六大场景中发挥关键作用:
- 获取外部信息:查询实时天气、股票价格等大语言模型训练数据中未包含的动态信息。
- 与数据库和接口服务交互:查询产品库存、检查订单状态、处理支付等结构化数据操作。
- 执行计算和数据分析:使用计算器、统计工具完成精确的数学运算和数据分析任务。
- 发送通知:通过邮件、消息等通信服务接口发送通知和信息。
- 执行代码:在安全的沙箱环境中运行代码片段,完成编程辅助和自动化任务。
- 控制系统或设备:与智能家居设备、物联网平台等联网系统交互,触发现实世界的操作。
4. 实现框架与特点
- LangChain:使用
@tool装饰器定义工具,通过create_tool_calling_agent和AgentExecutor构建能够使用工具的智能体,支持灵活的工具集成。 - CrewAI:提供简洁的工具定义方式,智能体可以轻松配备多个工具,支持复杂的多智能体协作场景。
- Google ADK:内置丰富的预置工具(Google 搜索、代码执行器、Vertex AI Search 等),同时支持自定义工具和企业级扩展。
5. 使用时机与价值
当智能体需要突破内部知识局限并与外部世界互动时,应当使用工具使用模式:
- 适用场景:需要实时数据或动态信息;需要访问私有或专有数据源;需要执行精确计算或代码;需要在其他系统中触发操作;需要与企业内部服务集成。
- 核心价值:将大语言模型从纯文本生成器转变为能够感知、推理和行动的智能体;使智能体能够处理现实世界的复杂任务;为构建真正实用的 AI 应用奠定基础。
以下为原书第五章工具使用模式的内容,原文链接:Chapter 5: Tool Use (Function Calling),译者:@Gino
工具使用模式概述
到目前为止,我们讨论的智能体模式侧重于在大语言模型间协调交互和管理智能体内部的信息流(如提示链、路由、并行化和反思模式)。但如果要让智能体真正有用、能与现实世界或外部系统交互,就必须赋予它们使用工具的能力。
工具使用模式通常通过函数调用(Function Calling)机制实现,使智能体能够与外部 API、数据库、服务交互,甚至直接执行代码。它允许作为智能体核心的大语言模型根据用户请求或当前任务状态,来决定何时以及如何使用特定的外部函数。
这个过程通常包括以下几个步骤:
-
工具定义: 向大语言模型描述外部函数或功能,包括函数的用途、名称,以及所接受参数的类型和说明。
-
大语言模型决策: 大语言模型接收用户的请求和可用的工具定义,并根据对两者的理解判断是否需要调用一个或多个工具来完成请求。
-
生成函数调用: 如果大语言模型决定使用工具,它会生成结构化输出(通常是 JSON 对象),指明要调用的工具名称以及从用户请求中提取的参数。
-
工具执行: 智能体框架或编排层捕获这个结构化输出,识别要调用的工具,并根据给定参数执行相应的外部函数。
-
观察/结果: 工具执行的输出或结果返回给智能体。
-
大语言模型处理(可选,但很常见): 大语言模型接收工具的输出作为上下文,并用它来生成对用户的最终回复,或决定工作流的下一步(可能涉及调用另一个工具、进行反思或提供最终答案)。
这种模式很关键,因为它突破了大语言模型训练数据的局限,使其能够获取最新信息、执行内部无法处理的计算、访问用户特定的数据,或触发现实世界的动作。函数调用是连接大语言模型推理能力与外部功能的技术桥梁。
虽然「函数调用」这个说法确实能准确描述调用预定义代码函数的过程,但从更广阔的视角理解「工具调用」这一概念更为有益。通过这个更广义的术语,我们看到智能体的能力可以远远超出简单的函数执行。工具可以是传统函数、复杂的 API 接口、数据库请求,甚至是发给另一个智能体的指令。这种视角让我们能够构想更复杂的系统,例如,主智能体可以将复杂的数据分析任务委托给专门的「分析智能体」,或通过 API 查询外部知识库。「工具调用」的思维方式能更好地捕捉智能体作为编排者的全部潜力,使其能够在多样化的数字资源和其他智能生态系统中发挥作用。
LangChain、LangGraph 和 Google ADK 等框架可以很方便地定义工具并将它们集成到智能体工作流中,通常会利用 Gemini 或 OpenAI 等现代大语言模型的原生函数调用功能。在这些框架中,你可以定义工具,并通过设置让智能体识别和使用这些工具。
工具使用是构建强大、可交互且能感知和利用外部资源的智能体的关键模式。
实际应用场景
当智能体需要的不只是文本生成,而是执行操作或检索动态信息的时候,工具使用模式几乎都能派上用场。
1. 从外部来源获取信息:
获取大语言模型训练数据中未包含的实时数据或信息。
- 用例: 天气信息智能体。
- 工具: 天气查询接口,可输入地点并返回该地的实时天气。
- 智能体流程: 用户提问「伦敦天气怎么样?」,大语言模型识别出需要使用天气工具,并使用「伦敦」作为参数调用该工具,工具返回数据后,大语言模型将这些信息整理并以易懂的方式输出给用户。
2. 与数据库和接口交互:
对结构化数据执行查询、更新或其他操作。
- 用例: 电商平台智能体。
- 工具: 通过接口来检查产品库存、查询订单状态或处理支付。
- 智能体流程: 用户提问「产品 X 有货吗?」,大语言模型先调用库存接口,工具返回库存数量后,大语言模型向用户反馈该产品库存情况。
3. 执行计算和数据分析:
使用计算器、数据分析库或统计工具。
- 用例: 金融领域智能体。
- 工具: 计算器函数、股票行情接口、电子表格工具。
- 智能体流程: 用户提问「苹果公司当前股价是多少?如果我以 150 美元买入 100 股,可能会赚多少钱?」,大语言模型会先调用股票行情接口获取最新价格,然后调用计算器工具计算收益,最后把结果整理并返回给用户。
4. 发送通知:
发送电子邮件、消息或调用外部通信服务的接口。
- 用例: 个人助理智能体。
- 工具: 邮件发送接口。
- 智能体流程: 用户说「给约翰发一封关于明天会议的邮件」,大语言模型会从请求中提取收件人、主题和正文,并调用邮件接口发送邮件。
5. 执行代码:
在受控且安全的环境中运行代码片段以完成特定任务。
- 用例: 编程助理智能体。
- 工具: 代码解释器。
- 智能体流程: 用户提供一段 Python 代码并问「这段代码是做什么的?」,大语言模型会先使用代码解释器运行代码,并据此进行分析和解释。
6. 控制其他系统或设备:
与智能家居设备、物联网平台或其他联网系统交互。
- 用例: 智能家居智能体。
- 工具: 控制智能灯的接口。
- 智能体流程: 用户说「关掉客厅的灯」,大语言模型将带有命令和目标设备信息的请求发送给智能家居工具以执行操作。
工具使用模式将语言模型从文本生成器变成能够在数字或现实世界中感知、推理和行动的智能体(见图 1)。
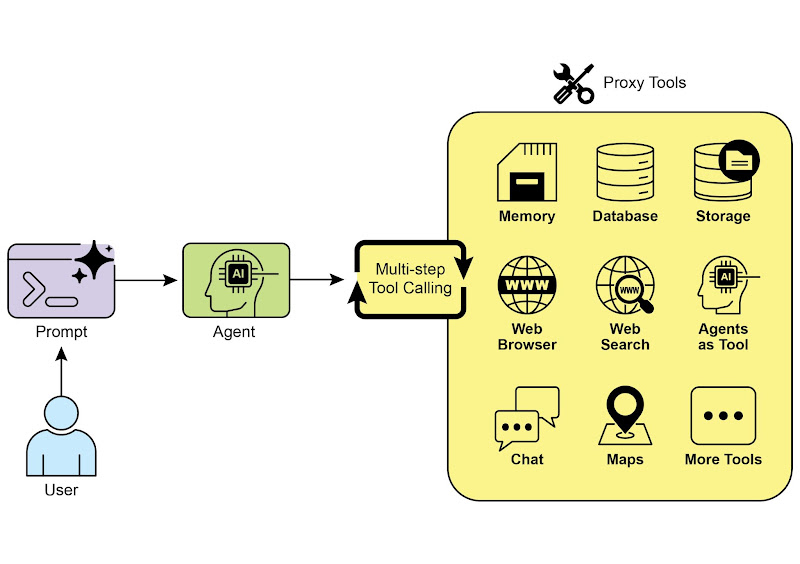
图 1:智能体使用工具的一些示例
实战代码:使用 LangChain
在 LangChain 框架中,使用工具分两个步骤。首先,定义一个或多个工具,通常通过封装现有的 Python 函数或其他可执行组件来完成。随后,将这些工具和大语言模型绑定,这样当大语言模型判断需要调用外部函数来完成用户请求时,就能生成结构化的调用请求并执行相应操作。
以下代码将演示这一原理。首先定义一个简单函数来模拟信息检索工具,然后构建并配置智能体,使其能够利用该工具响应用户输入。运行此示例需要先安装 LangChain 的核心库和相应的模型接入包,并在本地环境中配置好 API 密钥。
import os, getpass
import asyncio
import nest_asyncio
from typing import List
from dotenv import load_dotenv
import logging

from langchain_google_genai import ChatGoogleGenerativeAI
from langchain_core.prompts import ChatPromptTemplate
from langchain_core.tools import tool as langchain_tool
from langchain.agents import create_tool_calling_agent, AgentExecutor

# UNCOMMENT
# Prompt the user securely and set API keys as an environment variables
# 安全地提示用户设置 API 密钥作为环境变量
os.environ["GOOGLE_API_KEY"] = getpass.getpass("Enter your Google API key: ")
os.environ["OPENAI_API_KEY"] = getpass.getpass("Enter your OpenAI API key: ")

try:
   # A model with function/tool calling capabilities is required.
   # 需要一个具有函数调用能力的模型,这里使用 Gemini 2.0 Flash。
   llm = ChatGoogleGenerativeAI(model="gemini-2.0-flash", temperature=0)
   print(f"✅ Language model initialized: {llm.model}")
except Exception as e:
   print(f"🛑 Error initializing language model: {e}")
   llm = None

# --- Define a Tool ---
# --- 定义模拟的搜索工具 ---
@langchain_tool
def search_information(query: str) -> str:
   """
   Provides factual information on a given topic. Use this tool to find answers to phrases
   like 'capital of France' or 'weather in London?'.
   # 模拟提供关于特定查询的输出。使用此工具查找类似「法国的首都是哪里?」或「伦敦的天气如何?」这类问题的答案。
   """
   print(f"\n--- 🛠️ Tool Called: search_information with query: '{query}' ---")
   # Simulate a search tool with a dictionary of predefined results.
   # 通过一个字典预定义的结果来模拟搜索工具。
   simulated_results = {
       "weather in london": "The weather in London is currently cloudy with a temperature of 15°C.",
       "capital of france": "The capital of France is Paris.",
       "population of earth": "The estimated population of Earth is around 8 billion people.",
       "tallest mountain": "Mount Everest is the tallest mountain above sea level.",
       "default": f"Simulated search result for '{query}': No specific information found, but the topic seems interesting."
   }
   result = simulated_results.get(query.lower(), simulated_results["default"])
   print(f"--- TOOL RESULT: {result} ---")
   return result

tools = [search_information]

# --- Create a Tool-Calling Agent ---
# --- 创建一个使用工具的智能体 ---
if llm:
   # This prompt template requires an `agent_scratchpad` placeholder for the agent's internal steps.
   # 这个提示模板需要一个 `agent_scratchpad` 占位符,用于记录智能体的内部步骤。
   agent_prompt = ChatPromptTemplate.from_messages([
       ("system", "You are a helpful assistant."),
       ("human", "{input}"),
       ("placeholder", "{agent_scratchpad}"),
   ])

   # Create the agent, binding the LLM, tools, and prompt together.
   # 使用定义好的大语言模型、工具和提示词模板构建智能体。
   agent = create_tool_calling_agent(llm, tools, agent_prompt)

   # AgentExecutor is the runtime that invokes the agent and executes the chosen tools.
   # The 'tools' argument is not needed here as they are already bound to the agent.
   # AgentExecutor 负责调用智能体并运行其选择工具的运行时组件。
   # 这里的 'tools' 参数可以不需要了,因为它们已经绑定到智能体上了。
   agent_executor = AgentExecutor(agent=agent, verbose=True, tools=tools)

async def run_agent_with_tool(query: str):
   """
   Invokes the agent executor with a query and prints the final response.
   执行智能体并打印最终输出信息。
   """
   print(f"\n--- 🏃 Running Agent with Query: '{query}' ---")
   try:
       response = await agent_executor.ainvoke({"input": query})
       print("\n--- ✅ Final Agent Response ---")
       print(response["output"])
   except Exception as e:
       print(f"\n🛑 An error occurred during agent execution: {e}")

async def main():
   """
   Runs all agent queries concurrently.
   并发运行所有智能体查询任务。
   """
   tasks = [
       run_agent_with_tool("What is the capital of France?"),
       run_agent_with_tool("What's the weather like in London?"),
       run_agent_with_tool("Tell me something about dogs.") # Should trigger the default tool response
   ]
   await asyncio.gather(*tasks)

nest_asyncio.apply()
asyncio.run(main())以上代码使用了 LangChain 库和 Google Gemini 模型构建了一个使用工具的智能体。
首先定义了 search_information 工具,用于模拟检索特定问题的事实答案,比如「伦敦天气怎么样?」、「法国的首都是哪里?」和「地球的人口是多少?」,如果是其他问题就返回一个兜底回复。
接着初始化了一个具备工具调用能力的 ChatGoogleGenerativeAI 模型,并创建了用于引导对话的 ChatPromptTemplate。通过 create_tool_calling_agent 将上述定义的模型、工具和提示组合成智能体,并用 AgentExecutor 负责具体的执行与工具调用任务。
代码中还用异步函数 run_agent_with_tool,用于用指定输入调用智能体,并打印最终输出结果。主异步函数 main 则准备了多条查询,以测试工具 search_information 的输出情况,包括预定义的查询和兜底回复。
执行前代码会检查模型是否成功初始化,最后通过 asyncio.run(main()) 启动所有任务。
实战代码:CrewAI
以下代码展示了使用 CrewAI 框架实现函数调用的实际示例。场景很简单:为智能体配备用于查找信息的工具,并通过该智能体和工具来获取模拟的股票价格。
# pip install crewai langchain-openai

import os
from crewai import Agent, Task, Crew
from crewai.tools import tool
import logging

# --- Best Practice: Configure Logging ---
# A basic logging setup helps in debugging and tracking the crew's execution.
# --- 最佳实践:配置日志 ---
# 良好的日志设置有助于调试和追踪 crewAI 的执行过程。
logging.basicConfig(level=logging.INFO, format='%(asctime)s - %(levelname)s - %(message)s')

# --- Set up your API Key ---
# For production, it's recommended to use a more secure method for key management
# like environment variables loaded at runtime or a secret manager.
# --- 设置你的 API 密钥 ---
# 在生产环境中,推荐使用更安全的密钥管理方法,
# 例如在运行时加载环境变量或使用密钥管理器。
#
# Set the environment variable for your chosen LLM provider (e.g., OPENAI_API_KEY)
# 根据你选择的模型提供商设置环境变量(如 OPENAI_API_KEY)
# os.environ["OPENAI_API_KEY"] = "YOUR_API_KEY"
# os.environ["OPENAI_MODEL_NAME"] = "gpt-4o"

# --- 1. Refactored Tool: Returns Clean Data ---
# The tool now returns raw data (a float) or raises a standard Python error.
# This makes it more reusable and forces the agent to handle outcomes properly.
# --- 1. 重构后的工具 ---
# 该工具现在返回模拟的股价(一个浮点数)或抛出标准的 Python 错误。
# 这样可以提高可重用性,并确保智能体在处理结果时采取适当的处理措施。
@tool("Stock Price Lookup Tool")
def get_stock_price(ticker: str) -> float:
    """
    Fetches the latest simulated stock price for a given stock ticker symbol.
    Returns the price as a float. Raises a ValueError if the ticker is not found.
    获取指定股票代码的最新模拟股价信息。
    返回该股票的价格(浮点数)。如果找不到该代码,会抛出 ValueError 异常。
    """
    logging.info(f"Tool Call: get_stock_price for ticker '{ticker}'")
    simulated_prices = {
        "AAPL": 178.15,
        "GOOGL": 1750.30,
        "MSFT": 425.50,
    }
    price = simulated_prices.get(ticker.upper())

    if price is not None:
        return price
    else:
        # Raising a specific error is better than returning a string.
        # The agent is equipped to handle exceptions and can decide on the next action.
        # 与其返回一个字符串,不如抛出一个明确的错误,这样更清晰也便于处理。
        # 该智能体具备异常处理能力,能够在发生问题时判断并选择合适的后续动作。
        raise ValueError(f"Simulated price for ticker '{ticker.upper()}' not found.")


# --- 2. Define the Agent ---
# The agent definition remains the same, but it will now leverage the improved tool.
# --- 2. 定义智能体 ---
# 智能体的定义仍然沿用原有内容,不过现在会使用增强后的工具。
financial_analyst_agent = Agent(
  role='Senior Financial Analyst',
  goal='Analyze stock data using provided tools and report key prices.',
  backstory="You are an experienced financial analyst adept at using data sources to find stock information. You provide clear, direct answers.",
  verbose=True,
  tools=[get_stock_price],
  # Allowing delegation can be useful, but is not necessary for this simple task.
  # 允许委托在某些情况下很有用,但对于这个简单的任务并非必需。
  allow_delegation=False,
)

# --- 3. Refined Task: Clearer Instructions and Error Handling ---
# The task description is more specific and guides the agent on how to react
# to both successful data retrieval and potential errors.
# --- 3. 优化后的任务:提供更清晰的指引与更完善的错误处理 ---
# 任务描述更加详尽,能够指导智能体在查询成功和抛出错误时都采取正确的处理。
analyze_aapl_task = Task(
  description=(
      "What is the current simulated stock price for Apple (ticker: AAPL)? "
      "Use the 'Stock Price Lookup Tool' to find it. "
      "If the ticker is not found, you must report that you were unable to retrieve the price."
  ),
  expected_output=(
      "A single, clear sentence stating the simulated stock price for AAPL. "
      "For example: 'The simulated stock price for AAPL is $178.15.' "
      "If the price cannot be found, state that clearly."
  ),
  agent=financial_analyst_agent,
)

# --- 4. Formulate the Crew ---
# The crew orchestrates how the agent and task work together.
# --- 4. 构建 Crew 实例 ---
# 由该实例来负责协调智能体和任务。
financial_crew = Crew(
  agents=[financial_analyst_agent],
  tasks=[analyze_aapl_task],
  verbose=True # Set to False for less detailed logs in production
)

# --- 5. Run the Crew within a Main Execution Block ---
# Using a __name__ == "__main__": block is a standard Python best practice.
# --- 5. 在主程序中运行 ---
# 使用 __name__ == "__main__": 块是 Python 的最佳实践。
def main():
    """Main function to run the crew."""
    # Check for API key before starting to avoid runtime errors.
    # 在启动 Crew 之前,检查 OPENAI_API_KEY 环境变量是否已设置。
    if not os.environ.get("OPENAI_API_KEY"):
        print("ERROR: The OPENAI_API_KEY environment variable is not set.")
        print("Please set it before running the script.")
        return

    print("\n## Starting the Financial Crew...")
    print("---------------------------------")

    # The kickoff method starts the execution.
    # 使用 kickoff 方法启动执行。
    result = financial_crew.kickoff()

    print("\n---------------------------------")
    print("## Crew execution finished.")
    print("\nFinal Result:\n", result)

if __name__ == "__main__":
main()以上代码演示了一个使用 Crew.ai 库来模拟金融分析任务的简单应用。
首先定义了工具 get_stock_price,用于模拟查询指定股票代码的价格,当股票代码是预定义的有效代码时返回模拟的价格,如果是其他代码则抛出 ValueError 异常。
接着创建一个名为 financial_analyst_agent 的 Crew.ai 智能体,其被赋予的角色是高级金融分析师,允许使用 get_stock_price 工具进行交互。
随后定义了 analyze_aapl_task 任务,该任务要求智能体使用工具查找苹果(股票代码为 AAPL)的股价,并详细描述了如何处理成功和失败的情形。
然后基于上述的 financial_analyst_agent 智能体和 analyze_aapl_task 任务构建了 Crew 实例,并设置 verbose 为 true 以便在执行期间输出详细日志。
脚本的主体部分在标准的 if **name** == "**main**": 块内,使用 kickoff() 方法运行 Crew 实例的任务。在启动 Crew 之前,检查 OPENAI_API_KEY 环境变量是否已设置,这是智能体运行所必需的。
Crew 执行的结果最终被打印到控制台。代码中还包括了日志配置,以便能更好地追踪 Crew 的行为和工具调用。它使用环境变量管理 API 密钥,但在生产环境中推荐使用更安全的方法。
简而言之,这个示例展示了如何在 Crew.ai 中定义工具、智能体和任务,以创建协作式的工作流。
实战代码:使用 Google ADK
Google 开发者套件(ADK)内置了丰富的工具,这些工具可以直接整合到智能体中,方便扩展其功能。
Google 搜索: Google 搜索工具就是典型的例子,它提供 Google 搜索的接口,可以为智能体提供网络搜索和外部信息检索的功能。
from google.adk.agents import Agent
from google.adk.runners import Runner
from google.adk.sessions import InMemorySessionService
from google.adk.tools import google_search
from google.genai import types
import nest_asyncio
import asyncio

# Define variables required for Session setup and Agent execution
# 定义会话和智能体执行所需的变量
APP_NAME="Google Search_agent"
USER_ID="user1234"
SESSION_ID="1234"

# Define Agent with access to search tool
# 定义一个可以使用搜索功能的智能体
root_agent = Agent(
   name="basic_search_agent",
   model="gemini-2.0-flash-exp",
   description="Agent to answer questions using Google Search.",
   instruction="I can answer your questions by searching the internet. Just ask me anything!",
   tools=[google_search] # Google Search is a pre-built tool to perform Google searches. Google Search 是一个内置的工具,用来执行 Google 搜索。
)

# Agent Interaction
# 智能体调用函数
async def call_agent(query):
   """
   Helper function to call the agent with a query.
   辅助函数,传入查询参数调用智能体。
   """

   # Session and Runner
   # 会话和执行器
   session_service = InMemorySessionService()
   session = await session_service.create_session(app_name=APP_NAME, user_id=USER_ID, session_id=SESSION_ID)
   runner = Runner(agent=root_agent, app_name=APP_NAME, session_service=session_service)

   content = types.Content(role='user', parts=[types.Part(text=query)])
   events = runner.run(user_id=USER_ID, session_id=SESSION_ID, new_message=content)


   for event in events:
       if event.is_final_response():
           final_response = event.content.parts[0].text
           print("Agent Response: ", final_response)

nest_asyncio.apply()
asyncio.run(call_agent("what's the latest ai news?"))以上代码演示了如何使用 Python 版本的 Google ADK 创建一个简单的智能体,该智能体可以通过内置的 Google 搜索工具来回答问题。
首先从 IPython、google.adk 和 google.genai 导入必要的库,并定义应用名称、用户 ID 和会话 ID 等常量。
接着创建一个名为basic_search_agent 的智能体实例,详细描述智能体的功能和指令,同时声明使用 ADK 内预置的 Google 搜索工具。
然后在智能体辅助函数内,先初始化一个 InMemorySessionService(详见第八章)来管理智能体的会话,并使用之前定义的应用、用户和会话 ID 等常量创建新会话。接着创建 Runner 实例,将创建的智能体与上述会话服务连接起来,负责在会话中执行智能体的交互。这个辅助函数 call_agent 封装了向智能体发送查询和处理响应的过程,用户的查询被封装成角色为「user」的 types.Content 对象,该对象和用户 ID、会话 ID 一起传给 runner.run 方法启动执行。该方法随后返回事件列表,代表智能体的行为和响应。代码遍历这些事件以找到最终响应,如果某个事件被识别为最终响应,则提取其文本内容并输出到控制台。
最后代码传入问题「what's the latest ai news?」作为参数调用 call_agent 并来展示智能体的实际运行效果。
代码执行: Google ADK 还内置了用于执行动态代码的专门组件。built_in_code_execution 工具为智能体提供 Python 解释器执行的沙箱环境,使模型能够编写并运行代码来完成计算、处理数据和执行脚本。对于需要执行确定性逻辑和精确计算的场景,这个功能非常重要,因为这类问题不是概率性语言生成所能解决的。
# 依赖安装:
# pip install google-adk nest-asyncio python-dotenv

import os, getpass
import asyncio
import nest_asyncio
from typing import List
from dotenv import load_dotenv
import logging
from google.adk.agents import Agent as ADKAgent, LlmAgent
from google.adk.runners import Runner
from google.adk.sessions import InMemorySessionService
from google.adk.tools import google_search
from google.adk.code_executors import BuiltInCodeExecutor
from google.genai import types

# Define variables required for Session setup and Agent execution
# 定义会话和智能体执行所需的变量
APP_NAME="calculator"
USER_ID="user1234"
SESSION_ID="session_code_exec_async"


# Agent Definition
# 定义一个可以执行代码的智能体
code_agent = LlmAgent(
   name="calculator_agent",
   model="gemini-2.0-flash",
   code_executor=BuiltInCodeExecutor(),
   instruction="""You are a calculator agent.
   When given a mathematical expression, write and execute Python code to calculate the result.
   Return only the final numerical result as plain text, without markdown or code blocks.
   """,
   description="Executes Python code to perform calculations.",
)

# Agent Interaction (Async)
# 异步执行智能体
async def call_agent_async(query):

   # Session and Runner
   # 创建会话和执行器
   session_service = InMemorySessionService()
   session = await session_service.create_session(app_name=APP_NAME, user_id=USER_ID, session_id=SESSION_ID)
   runner = Runner(agent=code_agent, app_name=APP_NAME, session_service=session_service)

   content = types.Content(role='user', parts=[types.Part(text=query)])
   print(f"\n--- Running Query: {query} ---")
   final_response_text = "No final text response captured."
   try:
       # Use run_async
       # 使用 run_async 方法异步执行智能体
       async for event in runner.run_async(user_id=USER_ID, session_id=SESSION_ID, new_message=content):
           print(f"Event ID: {event.id}, Author: {event.author}")

           # --- Check for specific parts FIRST ---
           # has_specific_part = False
           # 首先检查是否有特定的部分
           if event.content and event.content.parts and event.is_final_response():
               for part in event.content.parts: # Iterate through all parts
                   if part.executable_code:
                       # Access the actual code string via .code
                       # 通过 .code 获取智能体生成的代码
                       print(f"  Debug: Agent generated code:\n```python\n{part.executable_code.code}\n```")
                       has_specific_part = True
                   elif part.code_execution_result:
                       # Access outcome and output correctly
                       # 获取代码执行结果并打印输出
                       print(f"  Debug: Code Execution Result: {part.code_execution_result.outcome} - Output:\n{part.code_execution_result.output}")
                       has_specific_part = True
                   # Also print any text parts found in any event for debugging
                   # 同时打印其他内容,便于调试
                   elif part.text and not part.text.isspace():
                       print(f"  Text: '{part.text.strip()}'")
                       # Do not set has_specific_part=True here, as we want the final response logic below
                       # 不要在这里设置 has_specific_part=True,因为我们还想要继续等待最终输出结果

               # --- Check for final response AFTER specific parts ---
               # 然后在特定部分检查之后处理最终结果
               text_parts = [part.text for part in event.content.parts if part.text]
               final_result = "".join(text_parts)
               print(f"==> Final Agent Response: {final_result}")

   except Exception as e:
       print(f"ERROR during agent run: {e}")
   print("-" * 30)

# Main async function to run the examples
# 运行示例
async def main():
   await call_agent_async("Calculate the value of (5 + 7) * 3")
   await call_agent_async("What is 10 factorial?")


# Execute the main async function
# 运行主异步函数以启动程序流程
try:
   nest_asyncio.apply()
   asyncio.run(main())
except RuntimeError as e:
   # Handle specific error when running asyncio.run in an already running loop (like Jupyter/Colab)
   # 处理在已经运行的循环(如 Jupyter/Colab)中运行 asyncio.run 时的特定错误
   if "cannot be called from a running event loop" in str(e):
       print("\nRunning in an existing event loop (like Colab/Jupyter).")
       print("Please run `await main()` in a notebook cell instead.")
       # If in an interactive environment like a notebook, you might need to run:
       # 在交互式环境中(如 Jupyter 笔记本),你可能需要运行:
       # await main()
   else:
       raise e # Re-raise other runtime errors
以上代码演示了如何使用 Google ADK 来创建具有代码执行能力的智能体,它通过编写和执行 Python 代码来解决具体的数学问题。
接着创建一个名为 code_agent 的智能体实例,详细描述智能体的功能和指令,要求它扮演计算器的角色,并可以使用内置的 built_in_code_execution 工具来执行代码。
核心逻辑位于 call_agent_async 函数中,该函数将用户查询发送给智能体的运行器并处理返回的事件。在该函数内部,使用异步循环遍历事件,打印生成的 Python 代码及其执行结果。代码区分了这些中间步骤和包含最终答案的结束事件。
最后,main 函数用两个不同的数学表达式运行智能体,以演示其执行计算的能力。
企业搜索: 下面这段 Python 代码使用 google.adk 库定义了一个 Google ADK 应用,使用 VSearchAgent 工具搜索 Vertex AI Search 数据来回答问题。
代码先创建了一个名为 q2_strategy_vsearch_agent 的 VSearchAgent 示例,提供详细的描述、使用的模型(gemini-2.0-flash-exp)以及 Vertex AI Search 数据存储的 ID,其中 DATASTORE_ID 需要通过环境变量设置。
接着为智能体设置 Runner 实例,并使用 InMemorySessionService 来管理对话历史。
核心的异步函数 call_vsearch_agent_async 用于与智能体交互,该函数接收查询请求构造为消息对象,并作为参数传给 run_async 方法从而实现将查询请求发送给智能体并等待异步事件返回。
随后该函数以流式方式将智能体的响应输出到控制台,并打印关于最终响应的信息,包括来自数据存储的元数据。代码具备错误处理机制,以捕获智能体执行期间的异常,并提供有价值的上下文信息,如数据存储 ID 不正确或权限缺失等。
另一个异步函数 run_vsearch_example 用于演示如何调用该智能体。主执行块先检查 DATASTORE_ID 是否已设置,然后使用 asyncio.run 运行示例。代码最后还包含一个异常检查,避免在已有运行事件循环的环境(如 Jupyter notebook)中运行代码时出现错误。
# Colab 代码链接:https://colab.research.google.com/drive/1AhF4Jam8wuYMEYU27y22r1uTbixs9MSE

# 依赖安装:
# pip install google-adk nest-asyncio python-dotenv

import asyncio
from google.genai import types
from google.adk import agents
from google.adk.runners import Runner
from google.adk.sessions import InMemorySessionService
import os

# --- Configuration ---
# --- 环境变量配置 ---
# Ensure you have set your GOOGLE_API_KEY and DATASTORE_ID environment variables
# 请确认已在环境变量中配置 GOOGLE_API_KEY 和 DATASTORE_ID

# For example:
# os.environ["GOOGLE_API_KEY"] = "YOUR_API_KEY"
# os.environ["DATASTORE_ID"] = "YOUR_DATASTORE_ID"

DATASTORE_ID = os.environ.get("DATASTORE_ID")

# --- Application Constants ---
# --- 定义常量 ---
APP_NAME = "vsearch_app"
USER_ID = "user_123"  # Example User ID
SESSION_ID = "session_456" # Example Session ID

# --- Agent Definition (Updated with the newer model from the guide) ---
# --- 定义一个使用 Vertex AI Search 数据存储的智能体 ---
vsearch_agent = agents.VSearchAgent(
    name="q2_strategy_vsearch_agent",
    description="Answers questions about Q2 strategy documents using Vertex AI Search.",
    model="gemini-2.0-flash-exp", # Updated model based on the guide's examples
    datastore_id=DATASTORE_ID,
    model_parameters={"temperature": 0.0}
)

# --- Runner and Session Initialization ---
# --- 初始化执行器和会话 ---
runner = Runner(
    agent=vsearch_agent,
    app_name=APP_NAME,
    session_service=InMemorySessionService(),
)

# --- Agent Invocation Logic ---
# --- 智能体调用逻辑 ---
async def call_vsearch_agent_async(query: str):
    """
    Initializes a session and streams the agent's response.
    初始化会话并使用流式输出智能体的响应。
    """
    print(f"User: {query}")
    print("Agent: ", end="", flush=True)

    try:
        # Construct the message content correctly
        # 构造消息对象
        content = types.Content(role='user', parts=[types.Part(text=query)])

        # Process events as they arrive from the asynchronous runner
        # 执行并处理异步事件
        async for event in runner.run_async(
            user_id=USER_ID,
            session_id=SESSION_ID,
            new_message=content
        ):
            # For token-by-token streaming of the response text
            # 处理流式输出的文本
            if hasattr(event, 'content_part_delta') and event.content_part_delta:
                print(event.content_part_delta.text, end="", flush=True)

            # Process the final response and its associated metadata
            # 处理最终输出及其关联的元数据
            if event.is_final_response():
                print() # Newline after the streaming response
                if event.grounding_metadata:
                    print(f"  (Source Attributions: {len(event.grounding_metadata.grounding_attributions)} sources found)")
                else:
                    print("  (No grounding metadata found)")
                print("-" * 30)

    except Exception as e:
        print(f"\nAn error occurred: {e}")
        print("Please ensure your datastore ID is correct and that the service account has the necessary permissions.")
        print("-" * 30)

# --- Run Example ---
# --- 运行示例 ---
async def run_vsearch_example():
    # Replace with a question relevant to YOUR datastore content
    # 请将此处的示例问题替换为与您数据存储内容相关、具体的问题
    await call_vsearch_agent_async("Summarize the main points about the Q2 strategy document.")
    await call_vsearch_agent_async("What safety procedures are mentioned for lab X?")

# --- Execution ---
# --- 执行 ---
if __name__ == "__main__":
    if not DATASTORE_ID:
        print("Error: DATASTORE_ID environment variable is not set.")
    else:
        try:
            asyncio.run(run_vsearch_example())
        except RuntimeError as e:
            # This handles cases where asyncio.run is called in an environment
            # that already has a running event loop (like a Jupyter notebook).
            # 处理在已经运行的循环(如 Jupyter notebook)中运行 asyncio.run 时的特定错误
            if "cannot be called from a running event loop" in str(e):
                print("Skipping execution in a running event loop. Please run this script directly.")
            else:
raise e总结一下,这段代码提供了用于构建对话式 AI 应用的基本框架,该应用通过查询 Vertex AI Search 中的数据来回答问题。示例详细展示了如何定义智能体、配置执行器,以及如何在异步交互中以流式方式接收响应。最终达到了从指定的数据存储中检索信息并将其整合以回答用户提问的目的。
Vertex 扩展: Vertex AI 扩展是对外部接口的结构化封装,允许模型直接连接外部服务以实现实时数据的处理和操作。扩展提供企业级的安全、数据隐私保护和性能保障,适用于生成与运行代码、查询网站、分析私有数据等场景。Google 提供了诸如代码解释器和 Vertex AI Search 的预置扩展,当然也支持自定义扩展。它们的核心优势是强大的企业控制能力以及与 Google 生态的无缝衔接。与函数调用不同的是,Vertex AI 会自动执行扩展,而函数调用通常需要由用户或客户端来触发和执行。
要点速览
问题所在: 大语言模型是强大的文本生成器,但它们本质上与外部世界脱节。它们的知识是静态的,仅限于训练时所用的数据,并且缺乏执行操作或检索实时信息的能力。这种固有的局限性使它们无法完成需要与外部接口、数据库、服务进行交互的任务。如果没有连接这些外部系统的桥梁,它们在解决实际问题的能力将大打折扣。
解决之道: 工具使用模式(通常通过函数调用机制实现)为这个问题提供了标准化解决方案。它的工作原理是,以大语言模型能理解的方式向其描述可用的外部函数或工具。基于用户请求,具有智能能力的模型可以判断是否需要使用工具,并生成结构化数据对象(如 JSON),指明要调用哪个函数以及使用什么参数。编排层负责执行此函数调用,获取结果,并将其反馈给模型。这使得大语言模型能够将最新的外部信息或操作结果整合到最终响应中,从而有效地赋予了它行动的能力。
经验法则: 当智能体需要突破大语言模型内部知识局限并与外部世界互动时,就应该使用工具使用模式。这对于需要实时数据(如查询天气、股票价格)、访问私有或专有信息(如查询公司数据库)、执行精确计算、执行代码或在其他系统中触发操作(如发送邮件、控制智能设备)的任务至关重要。
可视化总结:

图 2:工具使用模式
核心要点
- 工具使用(函数调用)模式使智能体能够与外部系统交互并获取动态信息。
- 这包括为工具定义清晰的描述和参数,以便大语言模型能正确使用这些工具。
- 大语言模型会决定何时使用工具,并生成结构化的数据以执行这些操作。
- 智能体框架负责执行实际的工具调用,并将结果返回给大语言模型。
- 工具使用模式对于构建能够执行现实任务并提供最新信息的智能体来说至关重要。
- LangChain 使用
@tool装饰器简化工具定义,并提供create_tool_calling_agent和AgentExecutor来构建能够使用工具的智能体。 - Google ADK 提供了多种非常实用的内置工具,比如 Google 搜索、代码执行器和 Vertex AI Search 工具,方便将外部功能直接集成到工作流程中。
结语
工具使用模式是一种重要的架构原则,用于把大型语言模型的能力扩展到纯文本生成之外。通过让模型能够与外部软件和数据源对接,这一模式使得智能体可以执行操作、完成计算以及从其他系统获取信息。当模型判断需要调用外部工具来满足用户请求时,它会生成一个结构化的调用请求。
像 LangChain、Google ADK 和 Crew AI 这样的框架提供了便于集成外部工具的抽象层和组件,负责向模型暴露工具的定义并解析模型返回的工具调用请求。总体而言,这大大简化了能够在外部数字环境中感知、交互和行动的复杂智能体系统的开发。
参考文献
- LangChain 文档(工具使用):https://python.langchain.com/docs/integrations/tools/
- Google 开发者套件(ADK)文档(工具使用):https://google.github.io/adk-docs/tools/
- OpenAI 函数调用文档:https://platform.openai.com/docs/guides/function-calling
- CrewAI 文档(工具使用):https://docs.crewai.com/concepts/tools